Description
Original Bosch and Siemens upper refrigerator door seal | 23002909
The original door seal 23002909, also known as a rubber seal, seals the refrigerator door and prevents warm air from entering and ice from building up inside the refrigerator compartment. The seal is suitable for Siemens KG49 3.0 series refrigerator models, including KG49NVXCG and KG49NVIDG. This is an original OEM part, in gray RAL7037, identical to the original manufacturer's specifications.
Ice builds up on the sides of the refrigerator even though the compressor is working normally? This is almost always a sign of a door seal that has lost its tightness. A moment before ordering, safety above all! To ensure a successful repair and prevent unnecessary waste of electricity, it is mandatory to use only an original seal. A non-original seal may not seal properly, and return the same problem in a short time. Click the 'Check Model Compatibility' button at the top of the page and our system will immediately confirm that the seal is suitable for your refrigerator.
Why does ice form inside the refrigerator even when it is working properly?
Ice that builds up on the sides of your refrigerator is usually caused by warm air getting in through a damaged seal. When the seal is cracked, dry, or not tight enough to the door, warm air enters the refrigerator compartment. The moisture in it freezes, and the compressor has to work harder to maintain the temperature.
How do you check if the gasket is really damaged?
The simplest test is the paper test. Insert a sheet of paper between the door and the body of the refrigerator, and close the door on it. If the sheet is removed easily and without resistance, it means that the seal at that point is no longer sealing. It is recommended to check several points around the perimeter of the door, not just one.
The solution: an original gasket with the exact size
The original gasket is manufactured exactly to the manufacturer's specifications, including the internal magnetic strip that creates a hermetic seal. Our certified technicians note that a non-original gasket sometimes comes in a slightly incorrect size , so it does not adhere well to the refrigerator body, and continues to allow cold to escape.
Where do you find the model sticker?
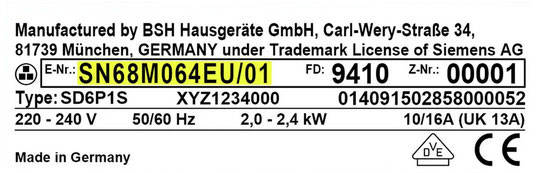
The model sticker (E-Nr) of the refrigerator is usually located inside the refrigerator compartment, on the inner wall, sometimes behind the vegetable drawer. It is recommended to check the exact number there before ordering. You can find all original Siemens spare parts in our variety of categories.
Original vs. Unapproved Replacement – What's the Difference?
| parameter |
Original part (OEM) |
Unapproved replacement |
| Match |
Accurate to the model, including color and dimensions |
Not guaranteed, may remain loose |
| Manufacturer's warranty |
Saved |
May be canceled |
| Safety: |
Tested according to manufacturer's standard |
Not verified |
| resistance |
Full product life, no cracks |
Accelerated wear and partial impermeability |
📋 Technical specifications
| attribute |
value |
| Manufacturer's SKU |
23002909 |
| Brand + Manufacturer Part Number (Brand+MPN) |
Bosch/Siemens 23002909 |
| brand |
Bosch, Siemens (BSH) |
| צבע |
Gray (RAL7037) |
| compatibility |
KG49 3.0 series refrigerators, according to the model list below |
| התקנה |
Simple DIY, no special tools required |
✅ Compatible models
The gasket is suitable for the following models (it is recommended to verify exact fit against the E-Nr number on the sticker):
Siemens (KG49 3.0 series): KG49NVXCG, KG49NVIDG
🔧 Installation instructions
In most models, replacement is done by inserting it into the slot, without the need to disassemble the door or use complex screws.
- Clean the edges of the door around the old gasket to remove dust and dirt.
- Gently pull the old gasket from the groove, from one corner to the other.
- Insert the new gasket into the same groove, starting from the corners and all the way around.
- Press gently along the entire circumference to make sure the gasket is securely in place.
- Close the door, and perform the paper test to ensure complete tightness.
Prefer an expert to install? Our service team is available to coordinate a professional installation.
💡 Tip from the experts
💡 Expert Tip: Sami, our service specialist, recommends warming up the new gasket slightly before installation, away from any heat source. This way, it is more flexible, fits into the groove easily, and is less likely to tear.
❓ Frequently Asked Questions
How do you know if the refrigerator door seal is damaged?
The simplest test is the paper test. Insert a sheet of paper between the door and the body of the refrigerator and close it. If the paper is removed easily and without resistance, it means that the seal at that point is no longer sealing. It is worth repeating the test in several points around the perimeter of the door.
Why does ice form on the sides of the refrigerator?
Ice is usually formed because warm air is entering through a damaged or loose door seal. The moisture in the warm air freezes on the walls, making the compressor work harder. Replacing the original seal stops the phenomenon and restores normal power consumption.
Can I replace a refrigerator gasket myself?
Yes, it's a simple DIY job that doesn't require a technician. Pull the old rubber seal out of the groove around the door, and insert the new seal in the same manner, from the corners outwards. The replacement usually takes a few minutes, and ends with a paper test to check the tightness.
The order includes full shipping information and a clear cancellation and return policy.




 CSB is the official service company for Kitchen & Home Appliances from Bosch, Siemens, Constructa and Gaggenau.


